1.  WINDOWS B UILDER 설치


HELP -> ECLIPSE MARKETPLACE... 


WINDOWS BUILDER

Restart Now 


디자이너


'Ubuntu' 카테고리의 다른 글

Ubuntu postgresql 연결하기  (0) 2022.03.25
"moserial" Ubuntu용 Rs232 통신 프로그램  (0) 2022.03.25
Ubuntu java eclips개발환경  (0) 2022.03.24
postgresql 재시작  (0) 2022.03.23
원도우-> 우분투 원격 접속  (0) 2022.03.23

1. 자바설치 

sudo apt install default-jdk


2. 설치후 버전 확인

java --version


3. 환경변수


which javac
readlink -f /bin/javac


파일 수정이 안되면 권한 변경후

sudo chmod 777 profile


환경변수 추가

export JAVA_HOME=/usr/lib/jvm/java-11-openjdk-amd64/bin/javac


저장확인

echo $JAVA_HOME


4. Eclipse 설치

sudo snap install --classic eclipse


5. Eclipse 실행


6. Hellow Java 출력

File -> New -> Java Project


System.out.print("Hellow Java");


'Ubuntu' 카테고리의 다른 글

"moserial" Ubuntu용 Rs232 통신 프로그램  (0) 2022.03.25
JAVA GUI PROGRAMING  (0) 2022.03.24
postgresql 재시작  (0) 2022.03.23
원도우-> 우분투 원격 접속  (0) 2022.03.23
Ubuntu 에 Postgresql 설치 및 외부접속  (0) 2022.03.23
sudo service postgresql restart

'Ubuntu' 카테고리의 다른 글

JAVA GUI PROGRAMING  (0) 2022.03.24
Ubuntu java eclips개발환경  (0) 2022.03.24
원도우-> 우분투 원격 접속  (0) 2022.03.23
Ubuntu 에 Postgresql 설치 및 외부접속  (0) 2022.03.23
File 권한 변경  (0) 2022.03.23

우분투쪽


1 sudo apt install -y xrdp
2 사용자 추가


윈도우쪽

 시작+R   


mstsc


우분투 IP 입력후 연결 


우분투쪽 추가된 사용자 아이디 입력


'Ubuntu' 카테고리의 다른 글

JAVA GUI PROGRAMING  (0) 2022.03.24
Ubuntu java eclips개발환경  (0) 2022.03.24
postgresql 재시작  (0) 2022.03.23
Ubuntu 에 Postgresql 설치 및 외부접속  (0) 2022.03.23
File 권한 변경  (0) 2022.03.23
1 sudo sh -c 'echo "deb http://apt.postgresql.org/pub/repos/apt $(lsb_release -cs)-pgdg main" > /etc/apt/sources.list.d/pgdg.list'
2 wget --quiet -O - https://www.postgresql.org/media/keys/ACCC4CF8.asc | sudo apt-key add -
3 sudo apt-get update
4 sudo apt-get -y install postgresql
5 sudo apt-get install -y postgresql postgresql-contrib


 # 5번에서 아래 오류가 나오면 

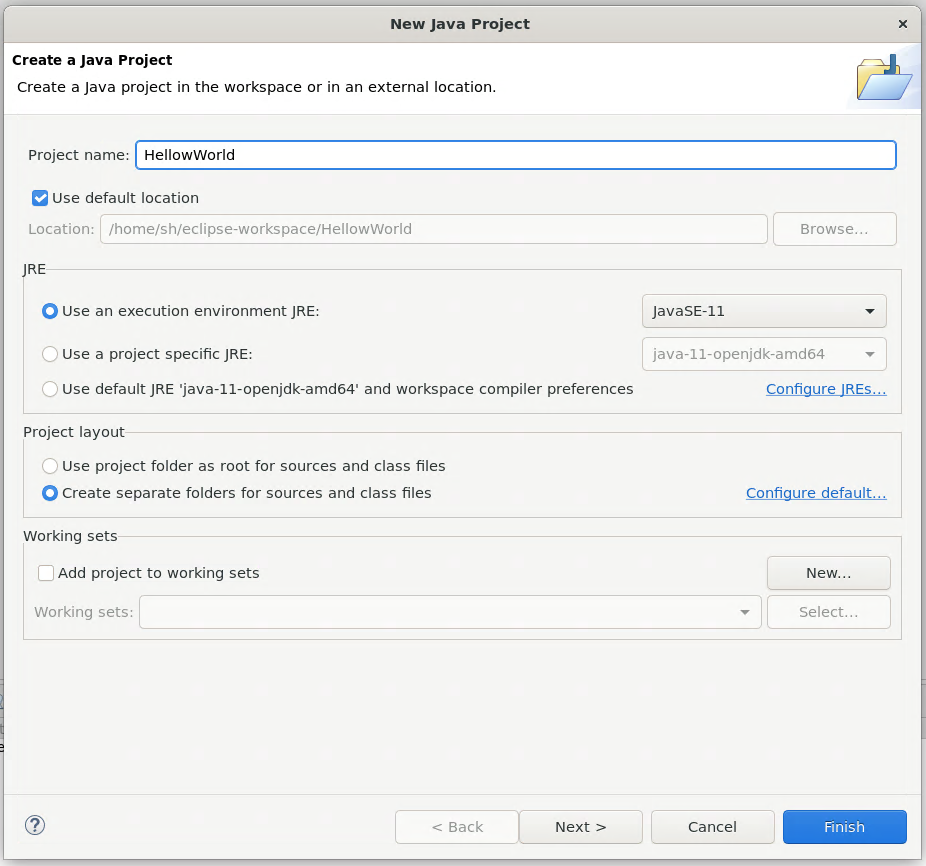
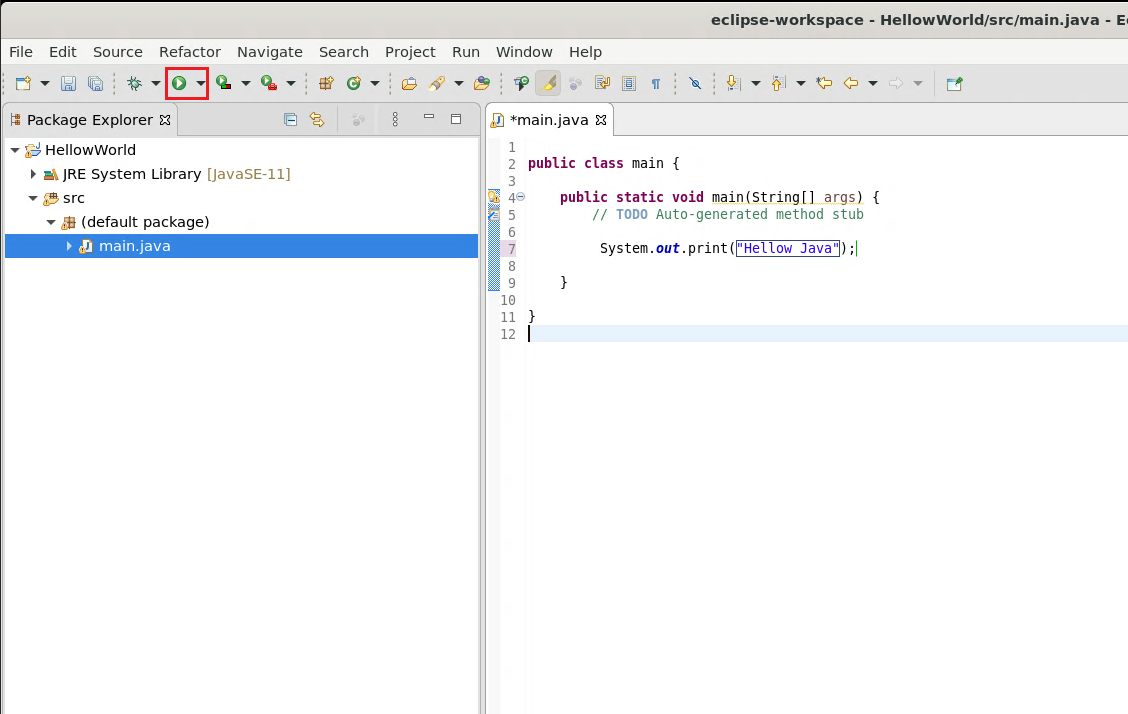
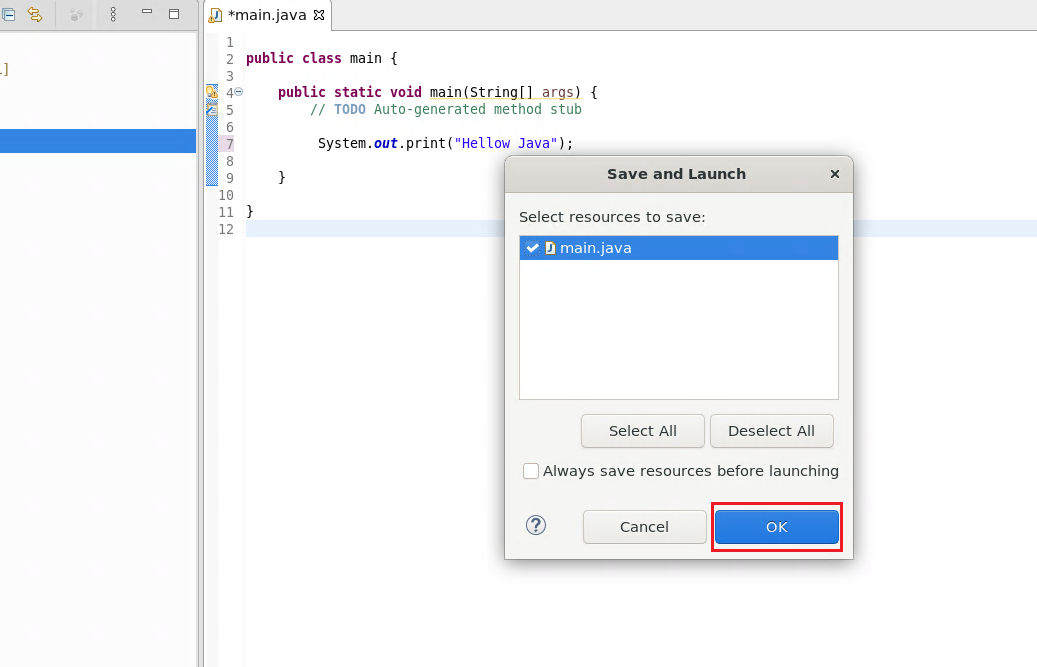
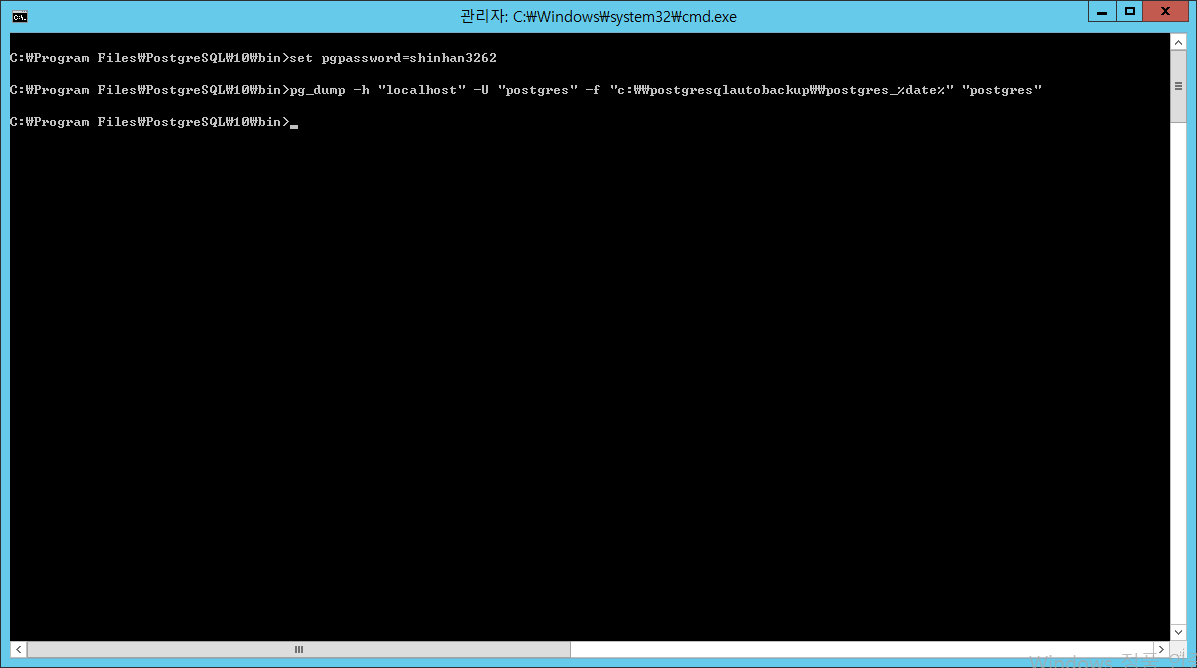
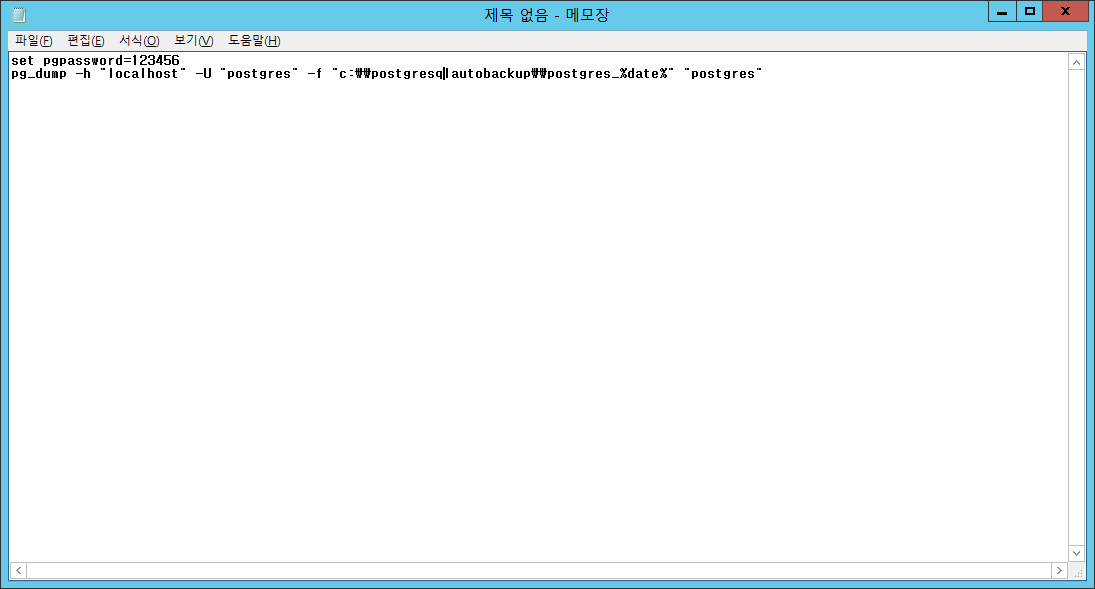
E: Could not get lock /var/lib/dpkg/lock-frontend. It is held by process 2813 (apt-get)
N: Be aware that removing the lock file is not a solution and may break your system.
E: Unable to acquire the dpkg frontend lock (/var/lib/dpkg/lock-frontend), is another process using it? 

1 sudo killall apt apt-get
2 sudo rm /var/lib/apt/lists/lock
3 sudo rm /var/cache/apt/archives/lock
4 sudo rm /var/lib/dpkg/lock*
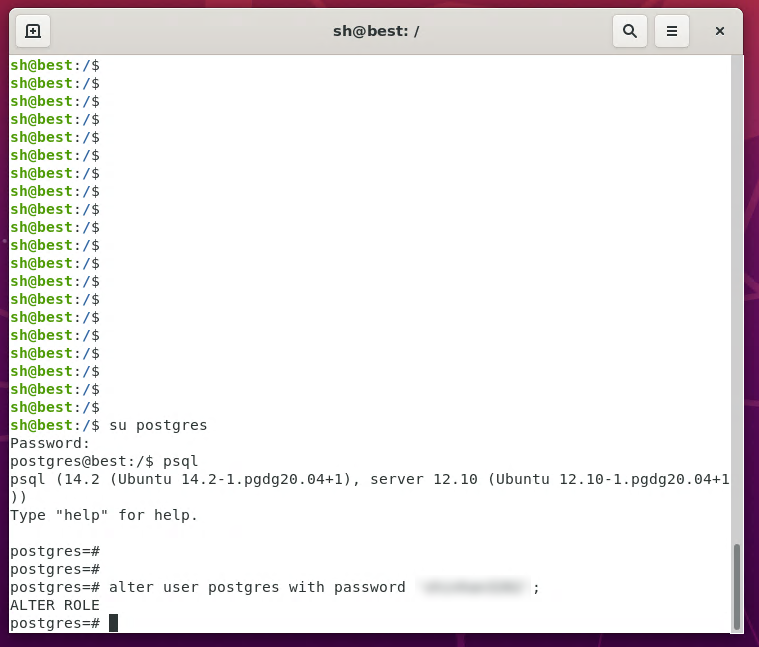
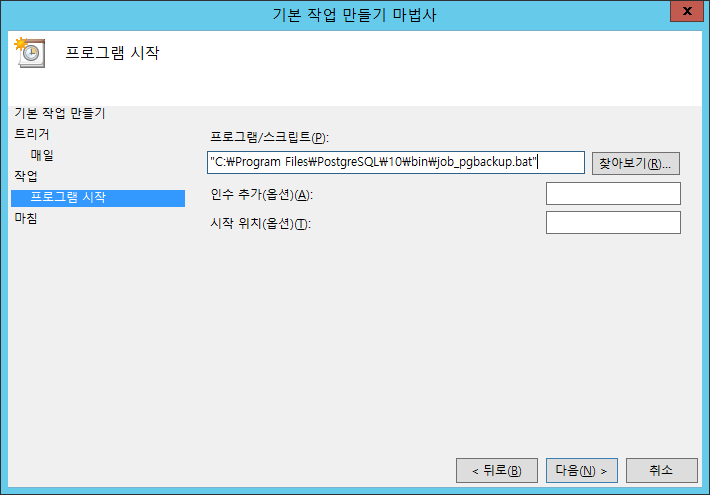
실행후 다시 5번 실행 


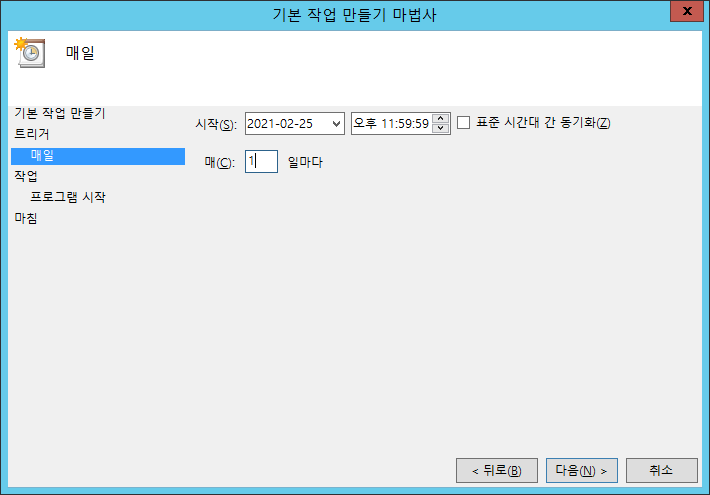
설치 완료후  우부툰 files 실행  (각 버전마다 12, 13, 14 이렇게 중간 폴더 이름이 틀림)


경로   ->  /ect/postgresql/12/main


postgresql.conf 파일 오픈  (읽기 전용 및 권한 변경 ) 

https://xandroid.tistory.com/entry/File-%EA%B6%8C%ED%95%9C-%EB%B3%80%EA%B2%BD?category=1033066


listen_address = '0.0.0.0' 변경 


pg_hba.conf 파일 수정

host           all         alll    0.0.0./0               peer -> md5


우분투 재시작 또는  posgtresql 재시작 

> https://xandroid.tistory.com/entry/postgresql-%EC%9E%AC%EC%8B%9C%EC%9E%91?category=1033066 


postgresql 재시작

sudo service postgresql restart

xandroid.tistory.com


postgres 비번 변경 


1 su postgres
2 psql
3 alter user postgres with password '1234';


Pgadmin 설치후  


User : postgres

Matinenect database : potgres 


'Ubuntu' 카테고리의 다른 글

JAVA GUI PROGRAMING  (0) 2022.03.24
Ubuntu java eclips개발환경  (0) 2022.03.24
postgresql 재시작  (0) 2022.03.23
원도우-> 우분투 원격 접속  (0) 2022.03.23
File 권한 변경  (0) 2022.03.23

text 파일 내용을 수정하거나 환경설정 파일을 수정하면 읽기전용이나 권한이 없을때

파일 권한을 변경하는 명령어


sudo  chmod 777  file1.txt  

(# sudo  =  superuser do )


아무런 코멘트가 없으면성공입니다. 슈펴유저 비번이 있어야됨.


'Ubuntu' 카테고리의 다른 글

JAVA GUI PROGRAMING  (0) 2022.03.24
Ubuntu java eclips개발환경  (0) 2022.03.24
postgresql 재시작  (0) 2022.03.23
원도우-> 우분투 원격 접속  (0) 2022.03.23
Ubuntu 에 Postgresql 설치 및 외부접속  (0) 2022.03.23

pg_dump 명령어 


postgresql 설치폴더를 찾음

(기본값은 c:\porogrm files\C:\Program Files\PostgreSQL\10\bin )


cmd 실행후 해당 경로로 이동함


pg_dump -h "localhost" -U "postgres" -f "c:\\저장파일경로\\저장파일명" "저장할 데이터베이스명"


c:\postgresqlautobackup  폴더를 만들고 


pg_dump -h "localhost" -U "postgres" -f "c:\\postgresqlautobackup\\postgres" "postgres"


암호를 물어보면 암호 입력후 


해당 경로에 백업이 잘 됨.


비밀번호 자동 입력과 파일 이름 날짜 변환 


set pgpassword=**********

pg_dump -h "localhost" -U "postgres" -f "c:\\postgresqlautobackup\\postgres_%date%" "postgres"


실행할수있도록 등록 배치파일 생성 


c:\porogrm files\C:\Program Files\PostgreSQL\10\bin\\job_pgbackup.bat 


윈도우 스캐줄러로 기본 작업 만들어서


매일 오후 11시 59분에 작업  백업이 됨.

'SQL > postgre' 카테고리의 다른 글

sequence 권한  (0) 2023.04.21
postgres 사용자 생성 & sql 권한 부여  (0) 2020.04.06

  YDLIDAR G2 360° Laser Scanner


PointCloudViewer_V6R01


============================================================================


scan start

중요 : Note 1: The G2 data communication adopts the little-endian mode and


COM 포트에 'A5 60' 전송하면 스케너가 회전하기 시작하고,  COM 포트에 위 응답 코드가 2회 수신되고

스캔값이 수신된다.


응답 프로토콜  : '5A 05 00 00 40 81,  A5 5A 05 00 00 40 81'

센서데이터 :


AA 55 00 28 09 2C 15 36 B2 67 D9 43 03 FD 43 03 FD 43 03 FD 43 03 FD 43 03 FD 43 03 FD 47 03 FD 43 03 EC 47 03 E5 47 03 A7 47 03 6A 47 03 3F 4B 03 13 4B 03 D7 4A 03 AF 4A 03 88 4A 03 5A 4A 03 27 4E 03 F1 4D 03 C4 4D 03 98 51 03 94 51 03 7D 51 03 57 51 03 43 55 03 30 59 03 29 59 03 1D 59 03 1A 5D 03 13 5D 03 0D 61 03 0B 61 03 00 61 03 F8 64 03 EB 68 03 DE 68 03 E2 6C 03 DF 6C 03 DD 70 03


AA 55 데이터 시작 


SCAN START


프로토콜


1. 거리계산 : 


       6FE5 = 28,645 / 4 = 7161.25  


============================================================================


2. 각도계산 : 


각도 및 각도 보정


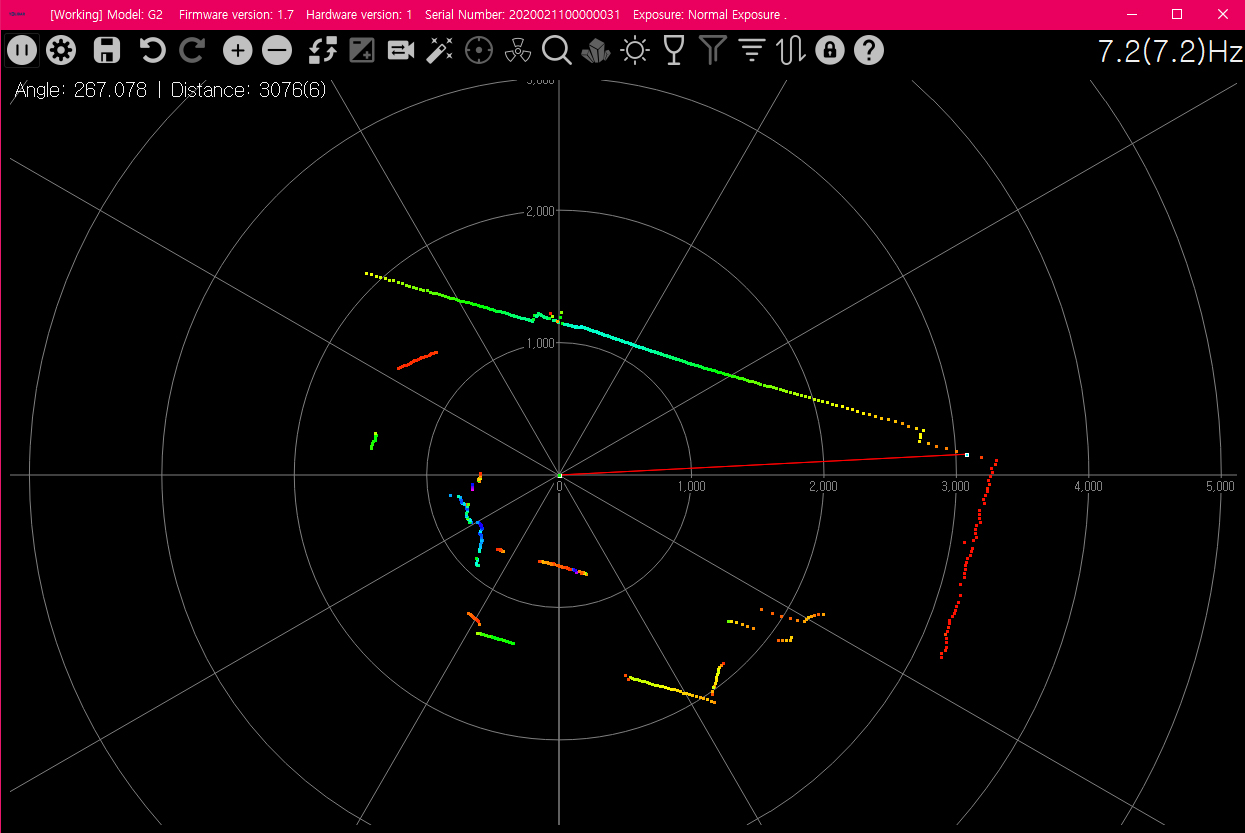
 아무리 계산해도... 거리랑 값이 틀리게 나옴.  그래서 본사에 메일 보내보니 G2 메뉴얼상 프로토콜이 틀림   ; ( 


메인 회신 내용 

=======================


The response content is the point cloud data scanned by the system. According to the following data format, the data is sent to the external device in hexadecimal to the serial port. Intensity Byte Offset: 

Scan data format output by LiDAR:

Content Name Description
PH(2B) Packet header 2 Byte in length, Fixed at 0x55AA, low is front, high in back.
CT(1B) Package type Indicates the current packet type. (0x00 = CT & 0x01): Normal Point cloud packet. (0x01 = CT & 0x01): Zero packet.
LSN(1B) Sample Data Number Indicates the number of sampling points contained in the current packet. There is only once zero point of data in thre zero packet. the value is 1.
FSA(2B) Starting angle The angle data corresponding to the first sample point in the smapled data.
LSA(2B) End angle The angle data corresponding to the last sample point in the sampled data.
CS(2B) Check code The check code of the current data packet uses a two-byte exclusive OR to check the current data packet.
Si(3B) Sampling data The system test sampling data is the distance data of the sampling point.
Zero resolution
Start data packet: (CT & 0x01) = 0x01, LSN = 1, Si = 1. For the analysis of the specific values of distance and angle, see the analysis of distance and angle.

Distance and Intensity analysis:
Si(3B) split into three bytes : S(0) S(1) S(2)

Inensity solution formula:
Triangle LiDAR:
Intensity(i) = uint16_t((S(1) & 0x03)<< 8 | S(0));
Distance solution formula:
Triangle LiDAR:
Distance(i) = uint16_t(S(2) << 8 | S(1)) >> 2;
Si is sampling data. Sampling data is set to 1F E5 6F. Since the system is in the little-endian mode, the sampling point S(0) = 0x1F, S(1) = 0xE5, S(2) = 0x6F, and it is substituted into the distance solution formula, which yields

Triangle LiDAR:
Intensity = uint16_t((0xE5 & 0x03)<< 8 | 0x1F) = 287;
Distance = uint16_t(0x6F << 8 | 0xE5) >> 2 = 7161mm;
Angle analysis:


First level analysis:
Starting angle solution formula:$$Angle_{FSA}=\frac{Rshiftbit(FSA, 1)}{64}$$ End angle solution formula:$$Angle_{LSA}=\frac{Rshiftbit(LSA, 1)}{64}$$ Intermediate angle solution formula: $$Angle_{i}=\frac{diff(Angle)}{LSN - 1}*i + Angle_{FSA} (0,1,\ldots,LSN-1)$$ $Angle_{0} : Angle_{FSA}$; $Angle_{LSN-1} : Angle_{LSA}$;

Rshiftbit(data,1) means shifting the data to the right by one bit.diff Angle means the clockwise angle difference from the starting angle (uncorrected value) to the ending angle (uncorrected value),and LSN represents the number of packet samples in this frame.

diff(Angle): (Angle(LSA) - Angle(FSA)) If less than zero, diff(Angle) = (Angle(LSA)- Angle(FSA)) + 360, otherwise diff(Angle) = (Angle(LSA)- Angle(FSA))

code

double Angle_FSA = (FSA >> 1) / 64;
double Angle_LSA = (LSA >> 1) / 64;
double angle_diff = Angle_FSA - Angle_LSA;
if(angle_diff < 0) {
    angle_diff += 360;
}
double Angle[LSN];
for(int i = 0; i < LSN; i++) {
    Angle[i] = i* angle_diff / (LSN - 1) + Angle_FSA;
}

Second-level analysis:
TOF LiDAR has no Second-level analysis.
Angle correction formula: $Angle_{i} = Angle_{i} + AngCorrect_{i}$; ($1,2,\ldots,LSN$) AngCorrect is the angle correction value, and its calculation formula is as follows, $tand^{-1}$ is an inverse trigonometric function. and the return angle value is:

if($Distance_{i}$ == 0) { $AngCorrect_{i}$ = 0; } else { $AngCorrect_{i} = atan(21.8 * \frac{155.3 - Distance_{i}}{155.3*Distance_{i}}) * (180/3.1415926)$ }

Note:

$AngCorrect_{i}$ need to convert to degree.
In the data packet, the 4th to 8th bytes are 28 E5 6F BD 79, so LSN = 0x28 = 40(dec), FSA = 0x6FE5, LSA = 0x79BD, and bring in the first-level solution formula, and get: $Angle_{FSA} = 223.78^{°}$ $Angle_{LSA} = 243.47^{°}$ $diff(Angle) = Angle_{LSA} - Angle_{FSA} = 243.47^{°} - 223.78^{°} = 19.69^{°}$ $Angle_{i} = \frac{19.69^{°}}{39}*(i -1) + 223.78^{°}$ ($1,2,\ldots,LSN$) Assume that in the frame data: $Distance_{1} = 1000$ $Distance_{LSN} = 8000$ bring in the second-level solution formula, you get: $AngCorrect_{1} = -6.7622^{°}$ $AngCorrect_{LSN} = -7.8374^{°}$ $Angle_{FSA} = Angle_{1} + AngCorrect_{1} = 217.0178^{°}$ $Angle_{LSA} = Angle_{LSA} + AngCorrect_{LSA} = 235.6326^{°}$ Similarly, $Angle_{i}(2,3, \ldots,LSN-1)$, can be obtained sequentially.

for(int i = 0; i < LSN; i++) {
    if(Distance[i] > 0) {
        double AngCorrect = atan(21.8 * (155.3 - Distance[i]) / (155.3 * Distance[i]));
        Angle[i] += AngCorrect * 180 / M_PI; // M_PI 3.1415926
    }
    if(Angle[i] >= 360) {
        Angle[i] -= 360;
    }   
}
Check code parsing:
The check code uses a two-byte exclusive OR to verify the current data packet. The check code itself does not participate in XOR operations, and the XOR order is not strictly in byte order. The XOR sequence is as shown in the figure. Therefore, the check code solution formula is:

$$ CS = XOR \sum_{i=1}^{n}(C^i)$$

CS Sequence

PH C(1)
FSA C(2)
S1 C(3)
S2 C(4)
... ..
Sn C(n-2)
[CT | LSN] C(n-1)
LSA C(n)
Note: XOR(end) indicates the XOR of the element from subscript 1 to end. However, XOR satisfies the exchange law, and the actual solution may not need to follow the XOR sequence.
Code
Intensity Si(3B):

uint16_t checksumcal = PH;
checksumcal ^= FSA;
for(int i = 0; i < 3 * LSN; i = i + 3) {
    checksumcal ^= data[i];
    checksumcal ^= uint16_t(data[i+2] <<8 | data[i + 1]);
}
checksumcal ^= uint16_t(LSN << 8 | CT);
checksumcal ^= LSA;

## uint16_t : unsigned short 

example
Intensity:

Name Size(Byte) Value Contant Buffer
PH 2 0x55AA Header 0xAA
0x55
CT 1 0x01 Type 0x01
LSN 1 0x01 Number 0x01
FSA 2 0xAE53 Starting Angle 0x53
0xAE
LSA 2 0xAE53 End Andgle 0x53
0xAE
CS 2 0x54AB Check code 0xAB
0x54
I0 1 0x00 0 index Intensity 0x00
S0 2 0x000 0 index Distance 0x00
0x00
uint8_t Buffer[13];
Buffer[0] = 0xAA;
Buffer[1] = 0x55;
Buffer[2] = 0x01;
Buffer[3] = 0x01;
Buffer[4] = 0x53;
Buffer[5] = 0xAE;
Buffer[6] = 0x53;
Buffer[7] = 0xAE;
Buffer[8] = 0xAB;
Buffer[9] = 0x54;
Buffer[10] = 0x00;
Buffer[11] = 0x00;
Buffer[12] = 0x00;

uint16_t check_code = 0x55AA;
uint8_t CT = Buffer[2] & 0x01;
uin8_t LSN = Buffer[3];
uint16_t FSA = uint16_t(Buffer[5] << 8 | Buffer[4]);
check_code ^= FSA;
uint16_t LSA = uint16_t(Buffer[7] << 8 | Buffer[6]);
uint16_t CS = uint16_t(Buffer[9] << 8 | Buffer[8]);

double Distance[LSN];
uin16_t Itensity[LSN];
for(int i = 0; i < 3 * LSN; i = i + 3) {
    check_code ^= Buffer[10 + i];
    uint16_t data = uint16_t(Buffer[10 + i + 2] << 8 | Buffer[10 + i + 1]);
    check_code ^= data;
    Itensity[i / 3] = uint16_t((Buffer[10 + i + 1] & 0x03) <<8 |  Buffer[10 + i]);
    Distance[i / 3] = data >> 2;
}
check_code ^= uint16_t(LSN << 8 | CT);
check_code ^= LSA;

double Angle[LSN];

if(check_code == CS) {
    double Angle_FSA = (FSA >> 1) / 64;
    double Angle_LSA = (LSA >> 1) / 64;
    double Angle_Diff = (Angle_LSA - Angle_FSA);
    if(Angle_Diff < 0) {
        Angle_Diff = Angle_Diff + 360;
    }
    for(int i = 0; i < LSN; i++) {
        Angle[i] = i * Angle_Diff/ (LSN- 1) + Angle_FSA;
        if(Distance[i] > 0) {
            double AngCorrect = atan(21.8 * (155.3 - Distance[i]) / (155.3 * Distance[i]));
            Angle[i] = Angle[i] + AngCorrect * 180 / M_PI;
        }
        if(Angle[i] >= 360) {
            Angle[i] -= 360;
        }
    }
}


=======================


 Si (2B) 2바이트라고 해놓고... 


뭐 어째든..  


                    Int32 CT = bytes[2] & 0x01;
                    Int32 LSN = bytes[3];
                    Int32 FSA = (bytes[5] << 8 | bytes[4]);
                    Int32 LSA = (bytes[7] << 8 | bytes[6]);
                    Int32 row = 0;
                    double[] Distance = new double[LSN];
                    Int32[]  Itensity = new int[LSN];

                    for (int i = 0; i < 3 * LSN; i = i + 3)
                    {
                        int data = (bytes[10 + i + 2] << 8 | bytes[10 + i + 1]);
                        Distance[i / 3] = data >> 2;
                    }

                    double[] Angle = new double[LSN];
                    double Angle_FSA = (FSA >> 1) / 64;
                    double Angle_LSA = (LSA >> 1) / 64;
                    double Angle_Diff = (Angle_LSA - Angle_FSA);

                    if (Angle_Diff < 0) Angle_Diff = Angle_Diff + 360;

                    for (int i = 0; i < LSN; i++)
                    {
                        Angle[i] = i * Angle_Diff / (LSN - 1) + Angle_FSA;
                        if (Distance[i] > 0)
                        {
                            double AngCorrect = Math.Atan(21.8 * (155.3 - Distance[i]) / (155.3 * Distance[i]));
                            Angle[i] = Angle[i] + AngCorrect * 180 / Math.PI;
                        }
                        if (Angle[i] >= 360) Angle[i] -= 360;

                        fpSpread1_Sheet1.RowCount += 1;
                        row = fpSpread1_Sheet1.RowCount - 1;
                        fpSpread1_Sheet1.Cells[row, 0].Value = Angle[i];       
                        fpSpread1_Sheet1.Cells[row, 1].Value = Distance[i];
                    }


0.5도 간격으로 센서값이 출력


+ Recent posts